
A blockchain based deep learning framework for a smart learning environment

This section discusses the actual development of the blockchain network, and the implementation of the proposed smart framework based on blockchain and deep learning, which is divided into two main parts. The first part is about the general blockchain network development, and the second part shows the integration of the blockchain with deep learning techniques for a smart learning system as well as, smart contract deployment.
Implementing the proposed framework is divided into two main parts: Part 1, which is the general blockchain development. It includes two phases. Phase 1 related to how to build the blockchain architecture, while phase 2 related to how to make the blockchain function. Then, Part 2, for implementing the proposed framework, is comprised of three phases, which are: storing learners’ data in the blockchain, apply the deep learning techniques and employ the smart contract.
Part 1: general blockchain development
This section illustrates the general development of blockchain architecture, which is composed of two phases, Phase 1 is building the blockchain architecture, and phase 2 is about how to allow the blockchain network to perform the general working functions such as mine blocks, get the blockchain, check the blockchain validation, decentralize the blockchain, add transactions, and create a smart contract.
Phase 1: build the blockchain architecture
First, a general blockchain is created with its components, which should be found inside each block. The blockchain is decentralized on several computers or servers. To implement the blockchain, we used the Anaconda IDE, which is considered a studio that includes a bunch of tools to deal with. The blockchain was created using Python as a programming language and PyCharm. PyCharm is a scientific development environment for the python. Before the creation of the blockchain, we installed some important tools inside the Anaconda, such as:
-
The flask web framework, which is used to build web applications containing the blockchain, will be used online on any server.
-
The request package, to run some requests, such as mining some blocks or adding new transactions inside the blockchain.
-
Postman, which is a user-friendly HTTP client, is used to interact with the blockchain and make some requests.
To start building the blockchain, important libraries should be imported first, like the DateTime library, because each block has its own timestamp, the exact date on which the block was created or mined. The essential hashlib library was used to hash the blocks, and it works with the hash function. From the JSON library, the dump’s function was used to encode the blocks before hashing them. Finally, the Flask library was used to enable the Flask class, which was used to create the web application’s objects. In addition, the jsonify function was used to return messages when we interacted with the blockchain via Postman, such as displaying the response to any requests to get the blockchain or mine a new block for the blockchain, and the jsonify function was used to return key information of the created block in a JSON format, such as the index of the block, the proof of the block, and the previous hash attached to the new block.
Phase 2: blockchain functions
Phase 2 of Part 1 of the proposed framework is applied to prove the implementation of the blockchain. Some functions were made to get the state of the blockchain and to mine new blocks in the blockchain through the Postman interface, which is a user-friendly interface.
Mine a new block
The first function inside the blockchain is to add a new block to the chain.
Decentralizing the blockchain
Decentralizing the blockchain network means setting up functional nodes in the Ethereum blockchain network through the MyEtherWallet (MEW) platform, where it acts as a client-side interface that is used for creating nodes’ accounts as wallets and shows the interaction between the nodes in the blockchain network. Figure 7 depicts a collection of functional nodes configured in the MyEtherWallet platform. It shows the setup of the university node in the network, the setup of the professor node in the network, the setup of the learner node in the network, and finally, the setup of the guest (employer) node in the network.

Setting up the functional nodes in the blockchain.
After creating the nodes and ensuring their connection to the decentralized network, each node from the various categories will access the myetherwallet to activate their wallet and obtain the keystore file, which contains the account address as well as the private and public keys. Each node should activate the wallet in the MEW by creating it and receiving the account address and the private and public keys.
Check validation
The blockchain functionality should be checked to see if it is valid or not before continuing in the next steps, such as configuring this architecture, linking it with the Ganache platform as the workspace of the private Ethereum platform, and viewing the blockchain from this interface.
Add transactions
This process considered how to add transactions to the block inside the blockchain. This process is applied through smart contracts. The process will be discussed in detail in phase 3 of Part 2, which will take up the process of employing the smart contract and how the transactions are added to the blockchain.
Part 2: integrate the blockchain and deep learning for a smart learning system
The second part of the implementation is about integrating the blockchain with deep learning, as mentioned previously in the illustration of the framework. The phases that are needed to achieve the goal of integrating these two important technologies are:
-
phase1: Store learner’s data in the blockchain.
-
phase2: Implement the deep learning techniques for predicting the learner’s academic performance.
-
phase3: Employ the smart contract.
Phase 1: store learner’s data in the blockchain
As mentioned before in the previous sections that illustrate the characteristics and features of the learner’s dataset, this phase proposes that the learner’s dataset will be stored on the blockchain using the interplanetary file system (IPFS) protocol, which provides solutions for the file storage problem, as it can store large files efficiently, which is a file-storage system suitable for the Internet’s next generation. IPFS is a document—oriented file system that can store files and keep track of their changes throughout time. IPFS creates a distributed file system that is inaccessible to outside parties by defining how a file passes over the network.
Storing learner’s dataset in the IPFS
To protect the data, it is stored in an encrypted format on an IPFS server under the appropriate supervisory authority (University) where a hash of the data is generated. The following Fig. 8 shows the IPFS and the total number of connected peers at the time.

First, the learner’s dataset used in the deep learning model was stored on the IPFS and a hash was generated. The dataset includes about 32,592 records. The following Fig. 9 show the learner’s data storage and its hash in the IPFS.

The uploaded learner’s dataset.
In phase 2, the implementation is applied on the stored learner’s data from the blockchain.
Phase 2: implementing the deep learning techniques
This phase relates to applying the deep learning techniques for predicting the academic performance of the learners in accordance with the dataset stored on the blockchain, as mentioned in the previous section. The implementation of the deep learning techniques in this study depends on four layers.
Layer 1: dataset acquisition
This layer is illustrated in detail in the previous section.
Layer 2: pre-processing
This layer includes five steps: feature selection, replacing missing values, handling categorical data, normalization or feature scaling, and dimensionality reduction.
Step 1 Feature selection.
In this process, we determine the most important features that will be utilized in the model as input and output features. We drop the unneeded features such as code_presentation, id_student, module_presentation_length, assessment_id, imd_band, and age_band from the input and consider the output feature to be the “final result”, by using the correlation coefficient for the numeric variable. The following Fig. 10 shows the heat map of the feature selection.

Heat map for feature’s selection.
Step 2 Replace missing values
The dataset has been cleaned, with some values addressed using the mode, as mentioned earlier, while the remaining null values have been replaced with [0].
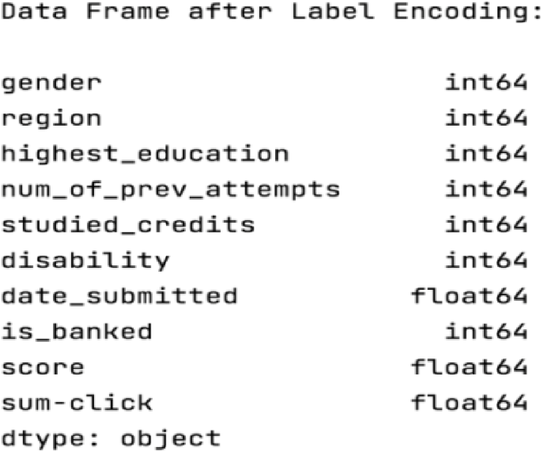
Step 3 Handle categorical data
In this step, all the text-value data is converted into numerical values, features like (gender, region, highest_education, and disability) are handled by the LabelEncoder. The following Fig. 11 shows the result of applying the label encoder algorithm for converting the categorical data into integer data.
Step 4 Normalization
Normalization is a sort of feature scaling that involves scaling features in a range of 0 to 1 in order to make the model more consistent and allow it to predict outcomes reliably. In this study, the dataset is rescaled using the MinMaxScaler. Scaling is performed twice: after training and after testing the dataset. Figure 12 displays the train after the scale, whereas Fig. 13 shows the test after the scale.
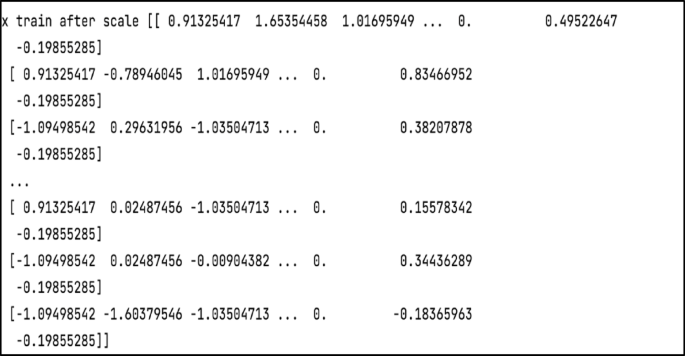
The training data after scaling.
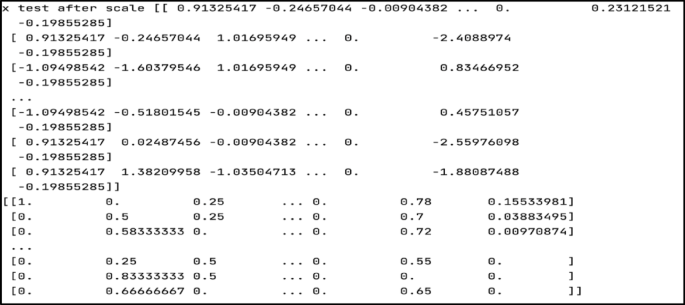
The testing data after scaling.
Step 5 Dimensionality reduction
Dimensionality reduction is the process of minimizing the dimensions of a huge dataset while retaining as much information as feasible. As a result, the predictive model’s quality improves while training time is reduced. The principal component analysis has four major steps: standardization, covariance, eigenvectors, and eigenvalues. Each of these steps is critical in the dimensionality reduction process50. In this work, the principal component analysis (PCA) is used to minimize the amount of features in the dataset while maintaining its quality to ensure model correctness.
Layer 3: split the dataset
The hold-out method is used to split the data into 90% train data and 10% test data and to increase the model’s accuracy.
Layer 4: build the deep neural network
The proposed learner’s performance prediction framework was implemented using the Python programming language through the PyCharm professional IDE. Several libraries were used, such as Sklearn, Keras, and Matplot. The following Fig. 14 illustrates the deep neural network model for predicting the learner’s performance in the virtual learning environment. The model consists of 7 layers: the input layer, 5 hidden layers, and the output layer. The input layer includes 10 neurons, which refer to the target features in the model. The hidden layers retain five hidden layers with a total of 500 neurons in each hidden layer, which are activated with the rectified linear unit function (Relu). The output layer consists of 4 neurons, where the softmax function is utilized for the output layer, and the best loss function accompanied by it is the sparse categorical cross-entropy function. All of these were performed with the utilization of the Adam optimizer.

The proposed deep neural networks.
The 4 output neurons refer to the student performance prediction, where 0 means fail, 1 means pass, 2 means withdraw, and 4 means distinction.
Phase 3: employing the smart contract
This phase captures the algorithms used for implementing the proposed framework and the process of deploying the smart contract that plays a vital role in integrating deep learning into the blockchain by adding transactions to the blocks inside the blockchain.
The implementation of the smart contracts takes place by using the remix solidity IDE, myetherwallet platform, and ganache interface that shows the insertion of the transactions into the block inside the Ethereum blockchain network. There will be two ways to deal with the contract, either to deploy and initiate the contract or interact with an existing contract.
In the proposed study, after applying the deep neural networks and predicting the learner’s academic performance status as well, the model proved its efficiency in comparison to other studies, the data will be stored on IPFS and stored on the blockchain for use in the smart contract.
Store the dataset hash on the Ethereum using smart contract
To complete and finish the process of storing learner’s data in the blockchain, the smart contract is used to store the dataset hash on the Ethereum blockchain network and to enable any node to access or view the data. The contract is written in the Solidity language and interacts with the blockchain via the Solidity remix IDE and Myetherwallet store the IPFS dataset’s hash in the blockchain through the smart contract and compiling the contract.
Deploy the contract on the Ethereum blockchain
-
The IPFS learner’s data and model’s result hash are stored in the learner’s profile in Myetherwallet on Ethereum blockchain platform. The byte code should be inserted, and the gas limit is determined automatically to deploy the contract and perform the transaction.
-
The Ganache platform is used to obtain the keys of the node to connect with the private Ethereum blockchain; in this case, the learner’s private key is retrieved from the ganache to access the wallet at any time.
-
Then the private key is used for the university’s node network to deploy the contract in myetherwallet.
-
The transaction being signed and published in the network.
link


